Here is sweet little baby Hailey Nicole right after she was born. Isn't she precious?
Sunday, April 23, 2006

Jessi at the Art Institute
Here is my step-daughter, visiting the Art Institute of Charlotte. She is considering taking some classes there. We enjoyed visiting with her and her sister and little baby Hailey Nicole!

Sunday, March 26, 2006
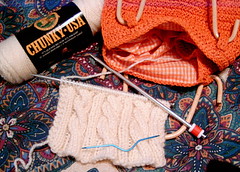
Irish Hiking Scarf
I decided to learn to make cables, so I found this free pattern on the internet. The Irish Hiking Scarf. It's a very easy pattern, and looks so nice! Marvin was watching me knit some of it last night and said, "Cool -you're using a different needle now!" He's so cute - watches every thing I do. I just love him.
I got the yarn at Hancock Fabrics 50% off, because it's been discontinued. Lion Brand Chunky USA in Fisherman.
I got the yarn at Hancock Fabrics 50% off, because it's been discontinued. Lion Brand Chunky USA in Fisherman.
Wednesday, March 22, 2006
Furry, Fuzzy Steering Wheel Cover

Skill Level: Beginner
For ANY SIZE steering wheel!
(Real Car, Toy Car, Lawn Mower, or Grandpa's Tractor!)
Yarn
· 1 skein Eyelash Yarn (I used leftover scraps of Lion Brand Fun Fur for a cool, funky look!)
· 1 skein Worsted Weight Yarn in a coordinating color (I used Red Heart Kids Yarn - Pink)
Both yarns will be held together throughout
Materials
U.S. Size 10 knitting needles, yarn needle for sewing
Directions
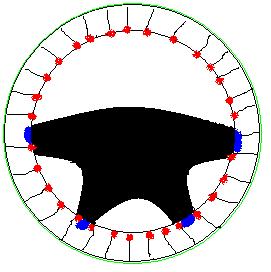
Before you start knitting, take a piece of string (one that WILL NOT STRETCH), and measure around the outside edge of your steering wheel. (Area to measure is shown in green in the schematic link.) Cut the string about one inch longer to allow room for a seam. This is the perimeter of your steering wheel. It’s not necessary to measure it, because you’ll just hold your knitting up to it later to see if it’s the right length. You should also cut a piece of string to measure around the thickness of your steering wheel. (You will NOT add an inch to that.)
Using one strand of each yarn held together, loosely cast on 10 to 15 stitches. (as many stitches as it takes for the thickness of your steering wheel.) Knit a few rows and check again to see if it’s the right width. (Use the short piece of string that you cut earlier as a guide.) If it’s not the right width, start over, because the cover has to be TIGHT around the wheel for safety!
Knit every row. Occasionally check to see if your knitting is long enough by stretching it out and measuring it against the longer string you cut earlier. (Don’t forget to STRETCH your knitting, since it needs to be tight around the steering wheel for safety.)
When it’s long enough, bind off loosely, and weave in the end of the eyelash yarn. Leave a long end of worsted weight free so you can use it for sewing. (The loose end of yarn should be at least 30 inches long.)
Connect the short ends of your knitting and sew a strong seam. Weave in any short ends. Remember to leave the long end of worsted weight yarn loose for sewing the cover to the wheel.
Put your creation around the steering wheel, making sure it’s arranged the way you like. (Be sure the seam you sewed earlier is not showing on the outside of the wheel!)
Using the long end of worsted weight yarn, sew the cover together along the inside edge of the steering wheel. I sewed a stitch at each ridge, and then pulled each stitch nice and tight (shown in red on schematic). When you get to the bars on your wheel, just weave the yarn through the back of the wheel cover (shown in blue on the schematic), then start sewing again at the next open section. When you go full circle to the beginning of your stitching, sew a couple stitches on top of each other to secure your yarn. Weave in the loose end and cut.
Put your hands around your furry steering wheel and smile!
April, 2005 - Designed by Sandy Davis
Sunday, March 19, 2006
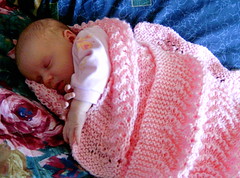
Hailey asleep with blanket
Here's my new grand-daughter, asleep in the blanket I knit for her! She's so sweet! We had a very nice visit yesterday. Marvin and I drove up and got a hotel room so his kids could visit with us and bring the baby. I couldn't go to their house because I'm allergic to the cats they have. We sat in the room for a while, then Marvin and the kids went to eat lunch, leaving me alone with the baby. She was so easy to take care of....she fell asleep almost as soon as they left. At first, she was a crying a little, so I started singing a lullaby. She stopped crying and really watched me as I sang. It was so sweet. The Sandman must have sprinkled dust in her eyes, because she soon fell asleep in my arms. So precious. I laid her down on the hotel bed, and she had a good nap.
Thursday, March 16, 2006
Baby Bonnet and Blanket - Feather and Fan
Here's the finished Feather and Fan set for my new step-granddaughter. It took a long time to knit and I had to re-design the pattern for the bonnet, but it worked out in the end!
Here's the pattern for the bonnet:
"Feather & Fan" Baby Bonnet
Revised by Sandy Davis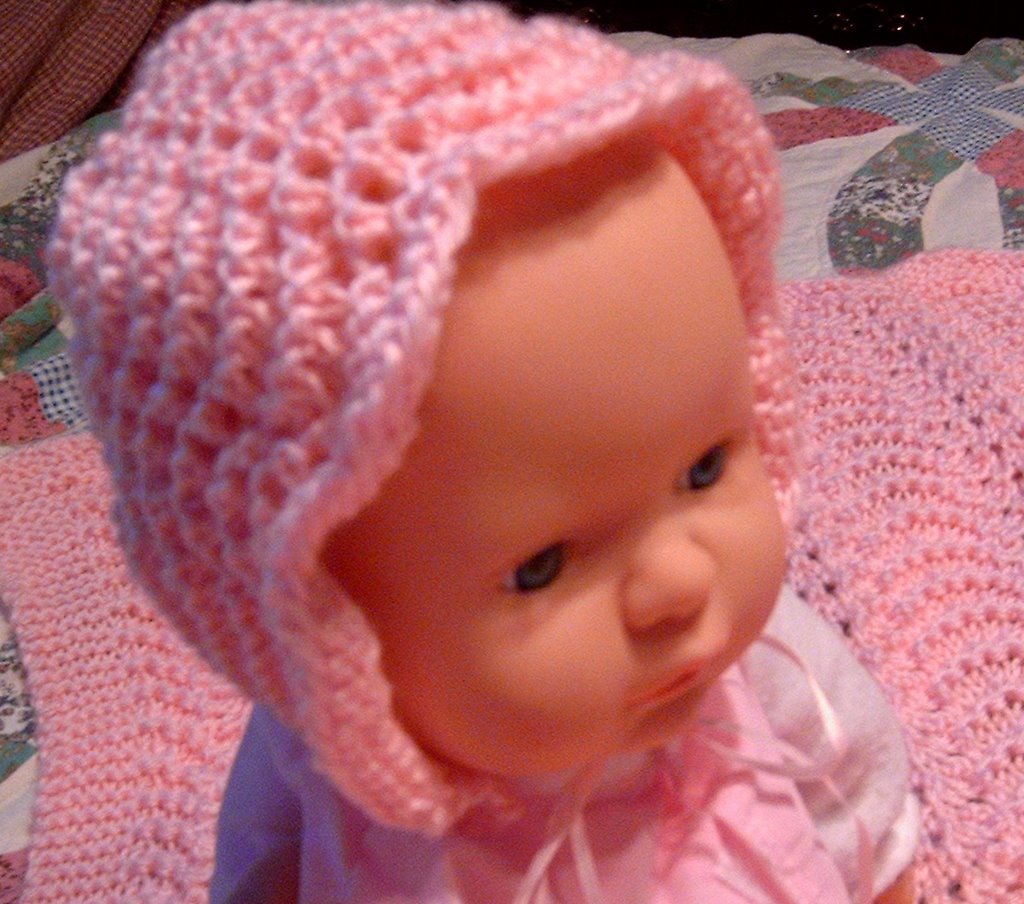
Materials: Knitting worsted weight yarn. approx. 2 ozs.
US #6 straight needles
US #6, 16” circular needles
Gauge: 10-11 sts to 2"
Directions:
Top of bonnet
Using straight needles, cast on 60 stitches. Knit 2 rows.
Feather and Fan pattern:
Row 1: Knit
Row 2: Purl
Row 3: K6 (garter st. border) K2tog 2 times, (YO, K1) 4 times,
*K2tog 4 times, (YO, K1) 4 times* - (repeat between * 2 times MORE)
K2tog 2 times, K6 (garter st border)
Row 4: Knit.Repeat these 4 rows 8 more times.
Back
Row1: *K8 K2tog, repeat from *
Row 2: *K7 K2tog, repeat from *
Row 3:*K6 K2tog, repeat from *
Continue in this manner until you K2tog across the row. (6 sts remaining)
Break yarn, thread through stitches and tighten to close. Sew crown seam.
Neck band
Using small circular needle, pick up and knit 38 sts around bottom of bonnet – 19 stitches from each side of center seam. Do NOT join.
Knit 3 rows back and forth (garter stitch).
(Eyelet row) K1 *YO K2tog, repeat from * to last stitch, YO, K1
Knit 3 more rows and cast off very loosely. (I use a larger needle)
Run pretty ribbon through eyelet holes and tie to close. (Not too tight or you’ll choke the baby!)
4-5-08: Edited to add the word MORE (in red), to avoid confusion with the feather & fan portion of the pattern.
Tuesday, March 14, 2006
Finished Booga Bag!
Well, I have crossed the line and actually felted something. I swore I would never do it, but it was fun!

Noisy Neighbor
My neighbor is always very loud and annoying. His porch is just beside my bedroom window.
Well, as some of you know, I had a hysterectomy recently, and I'm still stuck at home recuperating. I can't do any lifting or housework because of the stitches all across my belly.
Yesterday morning, my hubby left for work, and left our bedroom window open so I could enjoy the nice spring breeze all day. It was wonderful....until my neighbor got home. The loud engine, the loud rap music on the radio....my blood beginning to boil.....and then some FRIENDS show up in his driveway.
They were all out there talking as loud as possible, using very course language, and telling really raunchy jokes. I was fed up, so I tried to close the window, but of course I didn't have the strength. After looking around the room and considering my options, I grabbed one of my Charlotte Church CDs. She can sing as high, clear and pure as a bird, you know. I put on the CD and turned up the volume as loud as I could stand.
It was hilarious! I think they all must have stood there with their eyes open wide, thinking, "What the...?" They decided to go inside to continue their "discussion". Smugly, I turned down the volume and got back in bed to continue my knitting, while enjoying the rest of the CD.
Charlotte Church is my GOOD friend now.
Sunday, March 12, 2006
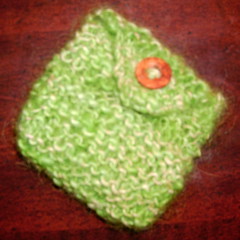
Handspun, Dyed, and Knit!
This was my very first FULLY made project. I washed and carded the yarn, then spun it and dyed it with Kool-Aid, then knit it. I was so proud!
Here's the pattern:
http://www.sweaterscapes.com/pursepat.htm
Here's the pattern:
http://www.sweaterscapes.com/pursepat.htm
Saturday, March 11, 2006
Yellow Knitted Easter Bunny
It's almost time for Easter, so I've gotten out my pretty pastel yarns to make some Easter Bunnies. So cute! I'm using Unger Fluffy yarn. I have lots of that yarn, in several different colors, so there's no telling how many bunnies I'll have!

Thursday, March 02, 2006
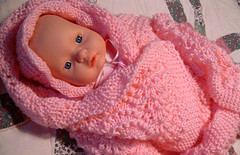
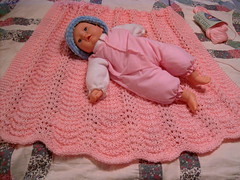
Pink Afghan Getting Longer Now!
I'm still working on that pink baby afghan. So far, it's 30 inches long, but the pattern calls for 44. Will it never end? I put my new baby doll with the afghan so you can see how big it has become.
Monday, February 27, 2006
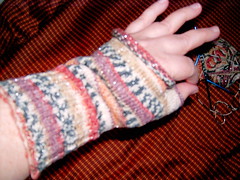
Sandy's Wrist Warmers from Sock Yarn
Sandy's Wrist-Warmers from Sock Yarn
Materials: 1 skein of Sock Yarn.
(I used Fortissima Colori Socka Color yarn, 50 gram ball.)
Size 2 double-point needles.
Size 2 straight needle for casting on.
Gauge: 30 stitches and 42 rows to 4 inches using a Stockinette Stitch on US Size 3 needles. (from the yarn wrapper)
With size 2 straight needle, cast on 64 stitches.
Divide stitches on 3 double point needles (20 sts on 2 needles, 24 sts on a third needle), join. Place a marker at the beginning of round.
Work in ribbing of k2, p2 for 3 inches.
Work in stockinette stitch (knit every round). Work 8 rounds even.
Next Round (Thumb Gusset) - Work to within 3 sts of marker at end of round, place another marker, inc in next st, k1, inc in last st.
Knit 2 rounds.
Next Round - Work to marker, inc in next st, knit to last st, inc in last st.
Knit 2 rounds.
Repeat last 3 rounds, working in same manner having 2 sts more between increases in thumb gusset until there are 21 sts in gusset (between markers).
Next Round - Work to marker, and place the remaining (gusset) stitches on a small holder or safety pin or thread.
Cast on 5 sts at the end of working needle, and join to beginning of round, skipping the thumb gusset.
Knit every row for 1 inch.
Bind off. Edge will roll.
(If you prefer, you can do ribbing instead for an even bind off edge.)
Place the 21 sts from holder on 2 needles.
Pick up and knit 5 or 6 sts from body of finished mitt.
Knit 1 round.
Next round - Knit even, knitting 2 sts together at the section where you picked up stitches earlier. This will help the thumb gusset lay nicely.
Knit every row for 1/2 inch. Bind off.
This edge will probably not roll since it's so small and fits nicely around the thumb.
You're done!
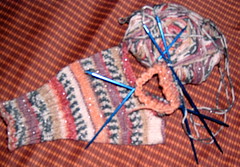
Wrist Warmer #2 on the needles
Here is my finished wrist warmer, and the second one started on double points. I love the way the yarn sparkles! I also love the way the stripes make "piano keys".
Sunday, February 19, 2006
Marvin and Granddaughter Hailey Brooke
Here is my sweet husband, holding his even sweeter new grandbaby, Hailey Brooke! I couldn't go to see her because I just had my hysterectomy surgery this week. I'll be going there soon, though! Until then, I'll be knitting and sewing baby things.

Baby Hailey Brooke
Baby Hailey Brooke is finally here! She is the daughter of Katie Davis, who is my step-daughter. So, that means, I'm a granny now. Neat! My husband Marvin is the proud grandfather. Hailey weighed 8 pounds, 15 ounces, and was 22 inches long. Way to go, Katie!

Monday, February 13, 2006
Blue Velour Pants - Finished!
I finished sewing these blue velour pants last night. They are so soft, and super comfortable! They were such a pain to sew, though. Golly, I didn't realize how hard velour would be to manage at a sewing machine. I had to push the fabric along to keep it going with the presser feet, and it caused so much static electicity with the thread! Whenever I finished a seam, I had to wet the thread to keep it from sticking to the body of the sewing machine.

Vintage Glass Collection
Here is most of my antique glass collection. I don't have a lot, but I really enjoy looking at it. Marigold or Amber Carnival glass are my favorites. I also like Peach Lustre Fire King dishes. I also have 4 teacups and saucers in that design. I love to have a cup of hot tea every day, and when it's poured into a fire king cup, I enjoy it even more!

Friday, February 10, 2006
Josh with Afghan
Here is my son, Josh. He came to visit me today from college. We had pizza for lunch, and had fun talking. I was on the computer in my bedroom, and Josh came in and relaxed on the bed to talk to me. I said, "Can I take your picture with your afghan?" He said, "I don't care." So, down the hall I went to grab the afghan and throw it on him. I don't think he moved an inch. :)

Thursday, February 09, 2006
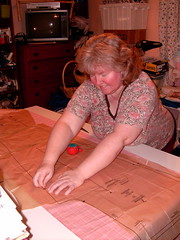
Cutting Out Pants Pattern
Here I am, cutting out a pair of pants to sew. It sure is nice to have a fold-away cutting table in my new craft room. Thanks Mom!
I'm making the pants for my recuperation at the hospital and at home after my hysterectomy.
I'm making the pants for my recuperation at the hospital and at home after my hysterectomy.
Tuesday, February 07, 2006
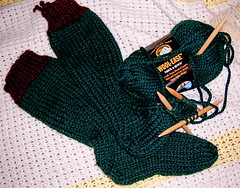
Thick Warm Socks for My Hospital Stay
I've almost finished knitting these nice warm socks for my hospital stay. I know I'll be needing them, because my feet always get so cold!
Subscribe to:
Posts (Atom)
