Wednesday, March 22, 2006
Furry, Fuzzy Steering Wheel Cover

Skill Level: Beginner
For ANY SIZE steering wheel!
(Real Car, Toy Car, Lawn Mower, or Grandpa's Tractor!)
Yarn
· 1 skein Eyelash Yarn (I used leftover scraps of Lion Brand Fun Fur for a cool, funky look!)
· 1 skein Worsted Weight Yarn in a coordinating color (I used Red Heart Kids Yarn - Pink)
Both yarns will be held together throughout
Materials
U.S. Size 10 knitting needles, yarn needle for sewing
Directions
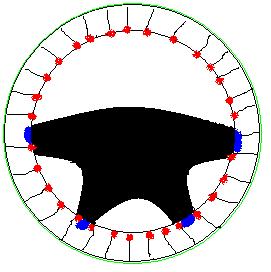
Before you start knitting, take a piece of string (one that WILL NOT STRETCH), and measure around the outside edge of your steering wheel. (Area to measure is shown in green in the schematic link.) Cut the string about one inch longer to allow room for a seam. This is the perimeter of your steering wheel. It’s not necessary to measure it, because you’ll just hold your knitting up to it later to see if it’s the right length. You should also cut a piece of string to measure around the thickness of your steering wheel. (You will NOT add an inch to that.)
Using one strand of each yarn held together, loosely cast on 10 to 15 stitches. (as many stitches as it takes for the thickness of your steering wheel.) Knit a few rows and check again to see if it’s the right width. (Use the short piece of string that you cut earlier as a guide.) If it’s not the right width, start over, because the cover has to be TIGHT around the wheel for safety!
Knit every row. Occasionally check to see if your knitting is long enough by stretching it out and measuring it against the longer string you cut earlier. (Don’t forget to STRETCH your knitting, since it needs to be tight around the steering wheel for safety.)
When it’s long enough, bind off loosely, and weave in the end of the eyelash yarn. Leave a long end of worsted weight free so you can use it for sewing. (The loose end of yarn should be at least 30 inches long.)
Connect the short ends of your knitting and sew a strong seam. Weave in any short ends. Remember to leave the long end of worsted weight yarn loose for sewing the cover to the wheel.
Put your creation around the steering wheel, making sure it’s arranged the way you like. (Be sure the seam you sewed earlier is not showing on the outside of the wheel!)
Using the long end of worsted weight yarn, sew the cover together along the inside edge of the steering wheel. I sewed a stitch at each ridge, and then pulled each stitch nice and tight (shown in red on schematic). When you get to the bars on your wheel, just weave the yarn through the back of the wheel cover (shown in blue on the schematic), then start sewing again at the next open section. When you go full circle to the beginning of your stitching, sew a couple stitches on top of each other to secure your yarn. Weave in the loose end and cut.
Put your hands around your furry steering wheel and smile!
April, 2005 - Designed by Sandy Davis
Subscribe to:
Post Comments (Atom)

19 comments:
OMG this is awesome!!!! i kinda hate fur yarns now, but this is a perfect way to bust the stash of my leftovers and I LOVE FUZZY STEERING WHEELS! So glad you posted this! :)
Now this is a pattern that actually works really well with fun fur! Bonus it seems to be on discount everywhere. :)
Thank you, Sandy!
I'm a "novice knitter" but when I came across this fun pattern, I had to try it! Your instructions were so easy and clear I had no trouble. My steering wheel never looked so good! I had so much fun making it and putting it on. A very fun, fast project. Thank you!
Wendy Christensen
South Carolina
Thank you all for your kind comments! It IS a fun pattern to make, if I do say so myself.
I would love to see photos of your completed steering wheels!
Hi Sandy,
this is a hoot! Please, would you allow Fiber Femmes to publish this at www.fiberfemmes.com? You'd retain all rights and we'd link to your blog and/or website. We'd also need a bio of you to put with the pattern.
Thanks for your consideration,
Sandra @ Fiber Femmes
www.fiberfemmes.com
The same pattern is available in Stitch & Bitch Nation by Debbie Stoller...
Well Liz, that's not correct. I've seen that pattern, and her design is different. Plus, I made my pattern before I ever saw her pattern.
My steering wheel cover is sewn onto the wheel, not just placed around it.
is this done in stockinette or garter stitch?
It's done in garter stitch. Knit every row.
That is just darling!! I have a friend who is getting her first car soon-what a perfect gift for her. I'm so glad I stumbled on this pattern... Thank you SO much, Ms. Sandy!:D:D
Love,
Lexie
Thank you, Lexie!
I'm glad you like it. :D
Cute idea!
AWESOME! I'm making one as soon as I get my hands on some fuzzy yarn!
Andi, do like me, and search your local dollar stores! I find eyelash yarn there all the time for a dollar a skein. :)
Hi Sandy This steering wheel cover is too cute. Can you make me one!
Please...dianalisboa@yahoo.com
Thanks!!!
Hi Diana!
I wish I could make one for you, but the design requires stitching the cover to the wheel. You should learn to knit! It's a VERY EASY pattern.
You could put a little rubber backing on and sew buttons on to keep it on the wheel too!
I love this, i just stumbled accross this today and im making one right now! I'm just worried about the fact that i have to sew it onto the wheel, if i ever want to take it off to switch it for a new one i will be ruining it :(
Angie, you'll want to change the steering wheel cover about every 6 months or so, because the eyelash yarn starts to wilt, and doesn't look as good as it did when it was new. This is to be expected, because steering wheels are used every day. I like making a new cover every season of the year, to make it look cool and fresh! :)
Post a Comment